





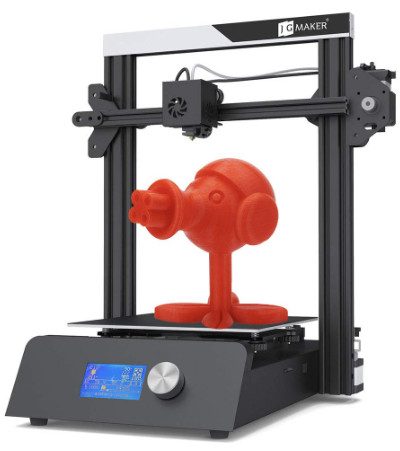
There is a new cheap 3D printer under $200 on the market. This is from JG Aurora. Read our JGAurora 3D printer review to find out the features, performance and price of the unit. Is it really worth the small price.
JGAurora JGMaker Magic 3D Printer

AVAILABLE ON AMAZON
JGAurora 3D Printer Review
The JGAurora JGMaker Magic is a cheap 3D printer in my test. This is a full-fledged FDM 3D printer that costs under $200. The unit comes with additional features, such as a filament runout sensor, heated print bed, filament holder, etc.
JGMaker Magic 3D Printer Technical Specs
General Specifications
[su_table]
| Technology | Fused deposition modeling (FDM) |
| Year | 2019 |
| Assembly | Partially assembled |
| Mechanical arrangement | Cartesian-XZ-head |
| Manufacturer | JGMaker |
[/su_table]
3D Printing Specifications
[su_table]
| Build volume | 220 x 220 x 250 mm |
| Feeder system | Bowden drive |
| Print head | Single nozzle |
| Nozzle size | 0.4 mm |
| Max. hot end temperature | 240 ℃ |
| Max. heated bed temperature | 110 ℃ |
| Print bed material | Removable magnetic sheet |
| Frame | Aluminum |
| Bed leveling | Manual |
| Connectivity | SD card, USB cable |
| Print recovery | Yes |
| Filament sensor | Yes |
| Camera | No |
| Filament diameter | 1.75 mm |
| Third-party filament | Yes |
| Filament materials | Consumer materials (PLA, ABS, PETG, Flexibles) |
[/su_table]
Software Requirements
[su_table]
| Recommended slicer | Cura, Simplify3D, Repetier-Host |
| Operating system | Windows, Mac OSX, Linux |
| File types | STL, OBJ, AMF |
[/su_table]
Dimensions & Weight
[su_table]
| Frame dimensions | 450 x 443 x 472 mm |
| Weight | 8 kg |
[/su_table]
What’s in the Box?
When you purchase the JGMaker Magic 3D printer review, this is what you’ll get in the box:
- A card reader
- A small spatula
- Filament roll holder
- Filament runout sensor
- A small sensor
- A variety of screws packed in well-labeled bags
- Other necessary tools
- Booklet manual
- An SD card reader
- An 8GB SD card
- Test filament


Apart from that, the items are packed in the usual Tetris manner. After unboxing the package, you can start assembling the device either according to instructions on the manual or the video instructions.
The screws are exemplary packed in labeled bags. Apart from that, the necessary tools, a card reader and a small spatula are included in the scope of delivery. Tweezers and the usual blue pliers are missing. There is a little spare material for that. So a couple of screws and a small sensor are also included twice in the scope of delivery.
Assembly Process
For the most part, the assembly is quite simple and can be done in 30-60 minutes. The electronics are located at the bottom of the housing. Therefore, roughly speaking, only the axles have to be mounted and the motors connected to the wiring harness.

This time I didn’t have to bother to unscrew the printer because there is no cover on the bottom. That is why the bottom of the photo above is also green, because any LED on the circuit board is green.
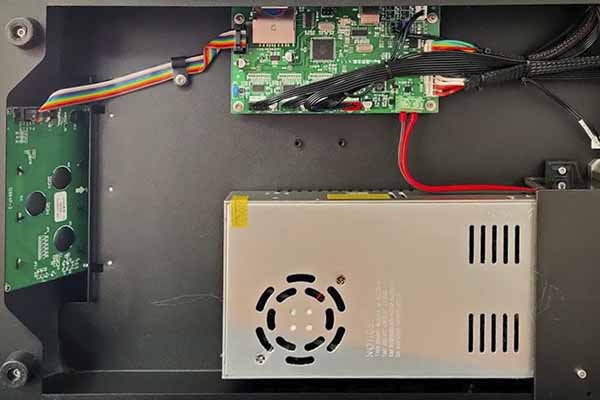
For my part, the lack of cover on the underside does not seem right. If you put the printer on a screwdriver or the like, a short circuit or the like could very quickly occur.
The wiring is fine to my non-electrician mind. No cable was disconnected or looked to be in any way. The rest of the processing of the printer is also exemplary. Nothing looks shaky or cheap.
The lack of a cover on the underside makes the fan in the power supply noisy during printing operations. The mainboard has permanently integrated drivers on the circuit board. Therefore, the printer cannot be made quieter without completely replacing the mainboard by installing quieter drivers.
In this case, you can install quieter fans. See our guide on the best 40mm fans for 3D printers. However, this is not a must. If you will not be using the printer in the living room or right next to or on the desk, the background noise is okay.
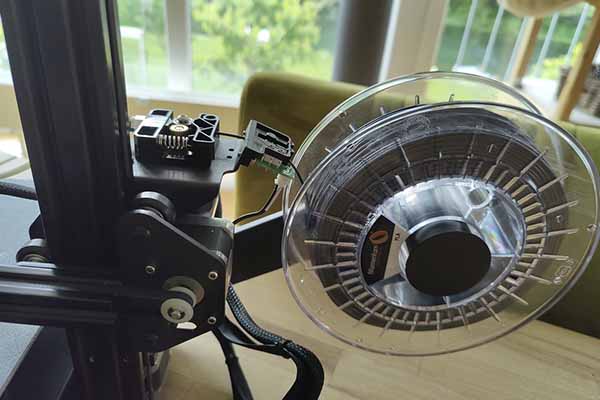
The scope of delivery also includes a holder for the filament rolls. The holder is so large that normal rolls can also be placed on it. With very small rolls, the strong axis of the bracket is likely to cause a problem.
In addition, a filament runout sensor is also included. The sensor is mounted directly on the extruder and has a strange angle for my taste. I haven’t quite risen to the question of whether the roll should deliver the filament from below or from above. 🙂
Print Head
The printhead is neatly assembled and preassembled and makes a valuable first impression. I like it when the wire harness plugs into a connector on the printhead. If necessary, you can replace the entire printhead. You don’t have to pull cables from the mainboard to the printhead for each element, or cobble together cables somewhere with the soldering iron.


Print Bed
The print bed has an extra pressure plate on the heating bed. The plate is held in place with the foldback clips and does not hold magnetically. The surface is slightly rough (almost reminiscent of sandpaper) and holds prints incredibly well!

Even when it had cooled down, various prints were very difficult to remove from the plate. But since it is only clipped, you can replace it with your personal favorite printing plate after a few prints.
I’ll show you the enclosed plate after 3-4 prints. Each time I had to freshly level, reset and set the nozzle a little higher (i.e. more distance between nozzle and plate), but the models could not adhere well.
That’s why I put on the cheap printing plate I trusted and with that, things worked without any problems. The printed numbers, for example, held on super well during printing. There was no warping and as soon as the plate had cooled down, you could literally flick the prints away with your finger.
The rough surface is handy and keeps the prints bombproof.
The filament remains on the orig. I couldn’t remove the plate either cold or warm, or with a spatula or IPA. Rarely seen anything like this. 🙂


En caso de que la tarjeta SD se extraiga accidentalmente durante una impresión (¿quién hace eso?), la impresora también tiene una función de reanudación. Esto significa que la impresión puede continuar después de insertar la tarjeta SD.
La impresora se controla a través de la conocida pantalla situada en la parte delantera, con una gran rueda giratoria al lado. La tarjeta SD se encuentra en el lado derecho. El volumen de suministro incluye un lector de tarjetas SD y una tarjeta SD de 8 GB. Esta última también contiene vídeos de instalación, PDFs y objetos de prueba.
Una vez montada la impresora, se realiza la habitual prueba de localización para ver si todos los cables, etc., están bien conectados y el cabezal de impresión se mueve en la dirección correcta y se detiene en los topes finales. Después, precalienta la cama de impresión, desactiva el stepper y nivélala con un trozo de papel.
Con la nivelación hecha, puedes empezar a imprimir de inmediato.
Calidad de impresión
Debería tener ya filamento en casa, ya que el que se suministra es realmente pequeño. Sin duda, no llegarás muy lejos con él.

Como prueba, sujeté un filamento PLA azul con purpurina y me sorprendió gratamente lo limpias que se imprimieron las primeras capas. ¡Realmente no te puedes quejar de eso!
Abajo hay más impresiones que hicimos con la impresora 3D JGAurora Magic.
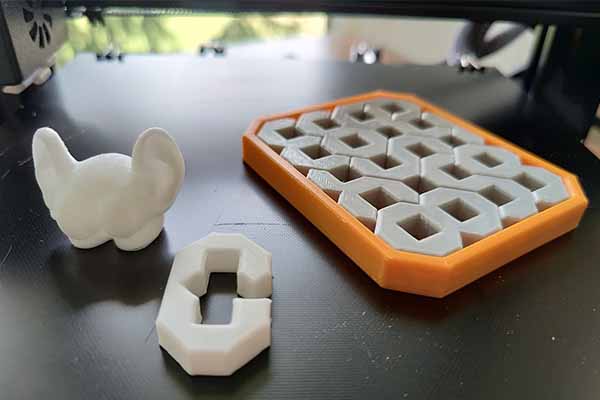
Se puede ver en el culo con orejas que los voladizos (el lóbulo de la oreja es siempre un problema) se imprimió bien. El planchado también funcionó muy bien (se puede ver el cero en la parte inferior del centro) y el cuestionario naranja/gris también quedó muy bien.
Con un poco de optimización de los ajustes se pueden eliminar las patas de elefante y entonces todo está bien.

Este jarrón también funcionó sin problemas al imprimirlo. Bueno, no del todo. Para obtener resultados con bellos detalles, tuve que reducir la velocidad de algunos objetos a 50-60 mm/s. Pero eso se debe a menudo a los objetos y menos a la propia impresora.
Para el rango de precios (comprobar el precio), me gusta mucho el resultado de la impresión.
Pasemos a las experiencias en la vida cotidiana. La impresora no es precisamente silenciosa. Si se quiere optimizar aquí, hay que cambiar los ventiladores, pero también es soportable.
El volumen de impresión de 220 × 220 × 250 debería ser suficiente para empezar.
La Magic sólo se acciona en un lado del eje z. Por lo tanto, asegúrate de que todo está correctamente ajustado al montarla. Aún así, incluso con un solo eje z accionado, la Magic imprimió muy bien en mi prueba.
Lo que no me gustó fue la imposibilidad de usar Baby-Steps para cambiar el eje Z mientras se imprime. Hasta ahora he podido reajustar la cama un poco en casi todas las impresoras y no he tenido que juguetear manualmente con los cuatro tornillos de nivel, lo que hay que reconocer que es muy malo e inexacto.
Buscaré un firmware de Marlin actualizado en los próximos días. La impresora ha estado en el mercado durante unos días. Algo debería encontrarse allí.
Conclusión
Dado que las impresoras 3D tienen una estructura modular, hay muchas piezas que podrían optimizarse y readaptarse. Sin embargo, esto también significa una impresora significativamente más cara. Por ejemplo, se pueden obtener 2 ejes Z adicionales, topes ópticos, controladores más silenciosos, ventiladores más silenciosos, camas de calentamiento más rápidas y mucho más. Pero ese no es el objetivo de esta impresora.
La JGAurora JGMaker Magic cuesta actualmente algo menos de 200 dólares en Amazon. Por lo tanto, es el modelo ideal para principiantes. Lo recomendamos para cualquier persona interesada en iniciarse en las impresoras 3D.
Sin embargo, si tienes algo de experiencia en la impresión 3D, o estás planeando permanecer en el hobby durante mucho tiempo, consigue algo más grande. Por supuesto, esto significará gastar un poco más de dinero. En este caso, recomendaríamos un modelo de Anycubic, Tevo o Creality.
DISPONIBLE EN AMAZON

